
One of the reasons I started this blog was because I wanted to document my exploits with quadcopters. I started playing around with quadcopters it about 2.5 years ago. I started by reading up all I could find on the internet and even made a flyable one with aeroquad in the summer of 2010.
I need to find a pic of the old quad and post here.
It wasn’t pretty, but it flew. I didn’t really have a good handle on the actual flying part and the project pretty much stopped there. I read up on quadcopter progress once in a while, but not much else. Fast forward to August of this year and my interest in quadcopters piqued again. I started building a new quadcopter, ordered some parts from hobbyking and ended up with this little thing

It’s quite fun, easy to control and didn’t cost me that much.
I also started work on a hexacopter, but haven’t done much else with it than building the frame and attaching the motors.

Ask away if you have any questions or comments… If anyone’s interested I can do a more thorough writeup of these builds, maybe with more videos, too.
Since I had the space for another grow setup I decided to build another grow light. I had some things I wanted to a bit differently from my other led grow light, so this was the perfect time to get cracking on version 2.0.
Parts list
My other parts list can be followed, but I decided to up the blue ratio, and added a few 6500k white LEDs to the mix. The heatsink is also smaller and the total LED count is 53.
I also decided to focus more on using the more efficient 620-630nm reds and 460-470nm blues in stead of the 660-670/445-450nm red/blues. There are a couple of reasons for it, but mainly because the higher efficiency leds are cheaper, output considerably more light per watt and because of that are probably just as well suited, or maybe even better (more light, right?).
I decided to go with the same type of heatsink as in my previous build, but opting for a considerably more dense layout, hopefully with more even light.
As you can see I just used libreoffice calc (similar to microsoft excel) to plan the layout. Each row represents a u channel aluminum profile.
My rationale for adding the white leds is providing a little extra light in other frequencies that plants use less of, but may (or may not) benefit from. Main reason is probably that I had the lights on hand so I figured why the hell not? I’ve grown aquarium plants with these exact LEDs with extremely good results before.
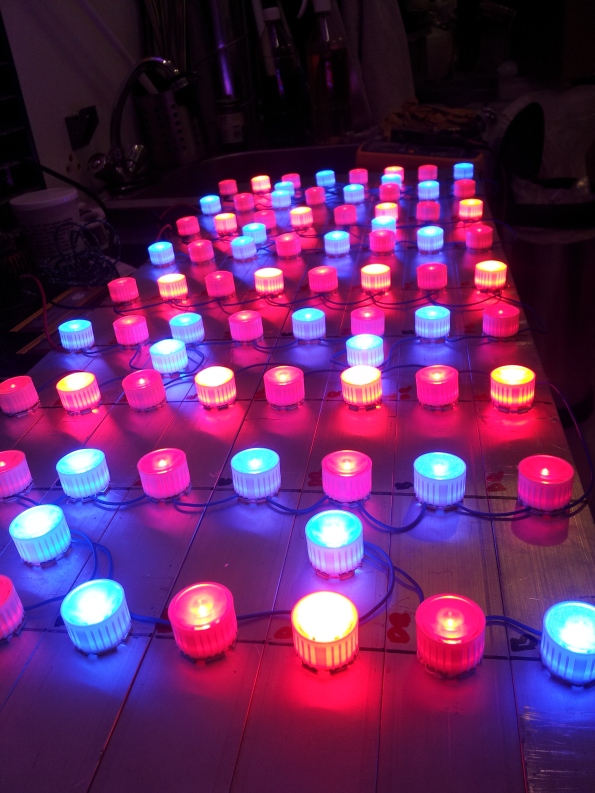
Here’s what the layout looks like when lit up with 60 degree lenses.

It’s ridiculously bright and hurts your eyes.
And here’s the back side of the heatsink, showing wiring and the fan.

If anyone has questions or comments about the build then by all means please ask in the comments.
I was having disappointing growth on most of the plants in my grow system, so I decided an upgrade was in order. Especially since winter is coming and I want to grow various edibles this winter.
My assumption about the slow/nonexistant growth was mainly that the reservoir the plants are (were) in is too small, causing swing in nutrient and pH levels.
So I decided to get a 50-60 liter opaque box as a reservoir, hopefully balancing pH and nutrient levels. I also decided not to go with a DWC system again, but instead going for a ebb & flow system.
Parts for ebb & flow system:
- Reservoir (60 liters)
- Grow bed container (50 liters)
- Clay pellets to fill grow bed container (~45 liters)
- Pump + Timer for pump
- Various hose fittings: 2x Tees, 2x Elbows, 2x grommets
The reservoir holds the nutrient solution (water + nutrients). Grow bed is full of clay pellets and is flushed with nutrient solution every few hours by the pump. The hose fittings are arranged in such a way that water will flow back to the reservoir well before the grow bed overflows.

More details to come.
I’ve been slacking on posting growth updates, but here’s something to feast your eyes on:

Note how the chili on the left is starting to yellow and has almost stopped growing, but the small one to the right of it has started growing, after not showing any growth for weeks.
The weird thing is that the plants are growing inconsistently, yet in the same growth medium with the same lighting. I have a few theories on what’s happening and how I can fix it.
Reservoir too small – inconsistent pH and nutrients
The reservoirs I’m running the plants in is small – only about 9-10 liters when full. That’s probably not good for stable pH and nutrients. So I’m thinking I need to up the size and that may fix alot of my problems.
The rightmost grow container lends credibility to that theory, because that’s an ebb and flow system, running from my aquariums. The growth there is phenomenal. I don’t add any nutrients there and the reservoir is about 500 liters. The plants are only feed fish poo 🙂
Not enough blue light
Plants need more blue light for vegetative growth, and more red light for blooming and fruit growth. What lends power to that theory is that my old chili plant is producing fruits like crazy, but not growing much. What distracts from that theory is that the aforementioned container running on my aquariums doesn’t seem to have any troubles with vegetative growth.
Possible solution: Change to the lucas formula of dosing, that has the same dosing schedule for vegetative and flowering/fruiting stage. It’s originally designed for cannabis apparently, but who says it isn’t good for my chilis and tomatoes? 🙂
Anyone care to comment on why I might be experiencing these issues?
This pic was taken on April 19th.

April 21st

April 23rd

April 26th

Looks like it’s starting to grow a lot faster now. I can’t wait!
With most of the hard work done (see earlier posts) it’s now just a matter of attaching the drivers to the heat sink and wiring everything together. I used the tabs on the drivers to fasten them to the heat sink with some 3.5mm stainless wood screws (yeah, wood screws). I first drilled a 3mm hole between the aluminum profiles, then fastened the drivers on. You could also use some hot glue, but this was easy enough for me and is removable if I need to replace some drivers or something like that.

Next thing you need to do is connect the drivers to power and to the LEDs. I used some house electrical connectors I had lying around, but you can also solder or wrap the wires together. Whatever works for you and is safe. Another very important thing is grounding the heat sink. Do it before you plug everything into the wall! By connecting the ground to the heat sink you are making sure that if you made a mistake somewhere and have live electricity leading into the heat sink it will trip the circuit breaker immediately and you won’t get electrocuted. If you don’t connect the ground to the heat sink and made a mistake somewhere with your wiring then you might shock yourself. Please be safe 🙂

Then it’s just a matter of plugging everything in and seeing if it works. Here I had already put the 60 degree lenses on. Makes the light a bit easier on the eyes. Some lenses didn’t sit tight enough on the LEDs so I just went ahead and put a dab of hot glue on each lens so it wouldn’t fall of. The lenses are still removable with the hot glue.

Yay! It works! Next up was running the lights for a while and see if the heat sink will get hot. After about 30-60 minutes I noticed that it was a tad warmer than I wanted it to be, so I added some fans to keep it cool. The fans are just normal 120mm computer case fans I had lying around and I power them up with a 12v wall wart I also had. You can run most computer fans at 7-12v DC, so if you have an old charger or something around then that might be enough to run the fans.

Then it’s just a simple matter of trying to keep the wires tidy and putting the lights above some plants!

The plants I have are basil, chilies, parsley, rosemary and some lettuce. I have some seedlings that I’ll add soon, and I will be moving the plants to a single ebb & flow container, as opposed to the DWC they are in now. But that’s something for another post 🙂
Here’s a small orange Trinidad Scorpion chili seedling that I moved under the LEDs. This pic was taken on April 6th, and I’ll post some weekly(ish) growth updates to document the growth under the DIY grow light.

Here’s the same seedling a week later (April 13th)

I have no idea if that’s considered good growth in a week or what, but at least it’s growing!
If you want to test your high power LEDs then probably the fastest way is to tape up a couple of AA batteries, put some wires on each end and use the wires to touch the LED pads. If the LED is OK it will light up.
Make sure that you tape the batteries together with one battery’s plus (+) terminal touching the others minus (-) terminal. You don’t have to do any soldering or anything if you just make sure to tape everything up tight.
Here’s what my “LED tester” looks like

It’s cheap and it works! Make sure not to connect the batteries to the LEDs for too long, because you are over driving the LEDs and they will burn out if connected for more than just a few seconds.
I have a few thoughts on the grow lights and where there might be room for improvements.
Troubleshooting
There were 3 faulty LEDs of all the LEDs I received. There are 2 main ways in how a LED can fail. One is that it just won’t light up and the rest of the string (series) is fine. And the other is where all the LEDs in the series won’t light up because of one faulty one. The latter is a bit harder to troubleshoot, and I don’t really have any solid recommendations on how to figure out which one is broken. One way however is to use 2x AA batteries and use them on each LED and see if they work.
Bottom line is: Be ready to troubleshoot your LEDs, especially if you opt to go with el cheapo eBay/china LED modules. And buy a few extra of each color – it’s going to come in handy some day.
LED color
Choosing the color of LEDs seems easy when you look at the spectra graph of plant light intake

You just pick the correct peaks and get the LEDs that match the peaks the closest, right? But one thing to consider is that LEDs are very different in efficiency depending on manufacturer and color. F.e. the 660-670nm LEDs I have put out about half the power the 620-630nm LEDs put out, but use the same amount of power and the more efficient LEDs cost less. Maybe it would be wiser to use more of the more efficient LEDs, and maybe just use the other ones to supplement in the red spectra. I don’t have any evidence (empirical or anecdotal) that it would be any worse (or better) than the light I built, but it’s worth looking at.
Mounting the lenses properly
If you do as I did originally and just solder 2 pads on the LEDs, then the lenses will sit slightly askew when you put them on. Pre-tin all the pads and you’ll avoid that problem. Another thing to note with the lenses is that they don’t always sit on very tight, so using some double-sided tape, hot glue or anything non-permanent might be good idea to prevent them from falling off. Lightly scuffing the plastic (the one that holds the lens) with your soldering iron might also work to hold the lens better.
Conclusion
I will probably create another post when/if I run into any issues that I didn’t find straightforward to solve. If you have any comments (f.e. on troubleshooting the LEDs) then by all means comment – I could use a better way to find faulty LEDs.
Cheers!
After some speculation I finally decided on how to arrange the LEDs (see last post). Now it is time to attach them to the heat sink.
I decided to use a thermal adhesive, but something tells me that might bite me in the ass because if a LED fails it might prove troublesome to remove it. Let’s hope these cheap china LEDs last 🙂
First thing I did was marking the proper spacing where I was going to put the LEDs

It’s important not to use too much thermal adhesive, otherwise this will become a very messy job. I marked what LED goes where before I started attaching the LEDs (DR – Deep Red, R – Red, DB – Deep Blue).
This is probably a little too much adhesive:

You want the adhesive to just spill from under the LED when you push it down. If you put too much, it’s going to look like this, or worse.

Then it’s just a matter of putting all of the LEDs in their place with a dab of adhesive


All done!

80 LEDs on the heat sink, waiting for the adhesive to harden so I can solder them all together. That’s going to be a blast! 160 solder joints.
